![]()
Managing Users
Important: If you are using Active Directory to Manage users, see Active Directory Feature.
This section also contains the following topics.
Removing Users from User Groups
Creating a New User
Important: If you are using Active Directory to add a new user, see Active Directory Feature. If you are using LDAP, see Adding User Information from an LDAP Server to Ektron CMS400.NET.
Before you can assign a user to a user group, you must add the user to the system. To create a new user, follow these steps.
1. Go to Workarea > Settings > Users.
2. Click Add User ( ).
).
3. The Add a New User to the System screen appears.
4. Enter the following information about the user.
Note: Administrator group members can edit all fields for any user. Non-admin users can edit their own profiles only, and only fields indicated in the Editable by non-admin users column below.
|
Field |
Description |
Editable by non-admin user |
|
General Tab (Tabs only appear when editing) |
||
|
Username |
Insert a username for the user you want to create. |
|
|
Path |
This field is only available when using LDAP Authentication. See Also: Adding User Information from an LDAP Server to Ektron CMS400.NET. |
|
|
First Name |
Enter the first name of the user. |
|
|
Last Name |
Enter the last name of the user. |
|
|
Display Name |
The name that is used to identify a user in the Workarea and on the Web site. This can be different from the Username, which is the name used to log in. Note: The Display Name cannot be blank. |
|
|
Enter a password for the user. See Also: Password Management. |
|
|
|
Confirm Password |
Confirm the password by typing it again. |
|
|
Select the language in which the user will view Ektron CMS400.NET screens and messages. The language also determines the default value whenever a drop-down list of languages appears within Ektron CMS400.NET. The dropdown list is derived from the Language Settings screen, available from the Settings > Configuration folder. Do not confuse the system language with the user’s ability to create and edit foreign editions of content. This field does not prevent a user from working with multiple language content. See Also: Working with Multi-Language Content Note: If the selected language is not English, French or German, it is only supported after you download the Ektron CMS400.NET Language Support Program from Ektron and translate the Web site. |
|
|
|
Email Address |
Enter the email address of the user. Notification email is sent to this address unless the Disable E-mail Notification field is checked. Also, this address identifies the user sending Instant email. See Also: Instant eMail |
|
|
Determines which editor will be used when this user replies to a Discussion Board. See Also: Using Discussion Boards on Your Web Site edits content from the Ektron CMS400.NET Workarea or after signing into your Web site if the user is operating a Windows computer and the system administrator has set UserPreferred as the value of the web.config file’s ek_EditControlWin key. See Also: Setting the Editor for Ektron CMS400.NET Users Your choices are eWebEditPro and eWebEdit400. See Also: Ektron CMS400.NET Editors |
|
|
|
Avatar |
An image or icon to represent you in the Forum. Type in a web path to image. For example: http://www.example.com/smileyface.gif
By default, the maximum file size of an avatar is limited to 200 kilobytes and the height and width of the avatar will be reduced 125 pixels preserving the aspect ratio. To change the file size limit, edit this file: C:\inetpub\<wwwroot>\<YourSite>\Workarea\Upload.aspx.vb In this file, change the line shown below to the size file you wish to allow. For example, to allow 500kb files, change 200 to 500. If (numFileSize > 200) Then Remember, this number is in kilobytes. To change the default height and width of the avatar, edit this file: C:\intetpub\wwwroot\<YourSite>\App_Code\VBCode\Utilities.vb In this file, change the following lines to the size you wish to allow. For example, to make avatars have a height and width of 166 pixels, change 125 to 166 in both these lines. Dim Width As Integer = 125 Dim Height As Integer = 125 |
|
|
Select to disable the email notifications for the user. If you do, the user does not receive the automatic email notification described in Automatic eMail Notification. However, this field has no effect on the user’s ability to receive instant email. |
|
|
|
Address |
Enter the address used to find this user’s location when a search based on location is being performed. |
|
|
Latitude |
The latitude used to find this user’s location when someone performs a search based on location. Google maps provides a service that takes the address of user and returns its latitude and longitude. Note: You don’t need to use Google’s automatic retrieval of latitude and longitude. Instead, you can enter the values manually. |
|
|
Longitude |
The longitude used to find your location when a user is performing a search based on location. Google maps provides a service that takes the address of content and returns its latitude and longitude. Note: You don’t need to use Google’s automatic retrieval of latitude and longitude. Instead, you can enter the values manually. |
|
|
Adds a signature to this user’s posts in the forum. The user does not see the signature in the editor. It is added after he clicks the Post button. |
|
|
|
Tags |
Select from a predefined list of Tags that describe yourself. Or, create a new tag by clicking the Click To Add A New Tag link. Placing a check mark in the check box next to a tag activates it for your profile. See Also: Tags |
|
| User Groups Tab (Tab only appears when editing) - Lists user groups to which the user belongs. See Also: Assigning Users to User Groups | ||
|
Workarea Tab (Tabs only appear when editing) |
||
|
When a check mark appears in this check box, the Workarea opens up to the size of the full screen. In addition, the Width and Height options are hidden. |
|
|
|
If desired, change the width of the screen in which Ektron CMS400.NET appears for this user. The width in pixels must be between 400 and 2400. This field accommodates users who have larger monitors and/or prefer a smaller resolution, such as 1280 x 1024. If a check mark appears in the Full Screen check box, this option is hidden. |
|
|
|
If desired, you can change the height of the screen in which Ektron CMS400.NET appears for this user. The height in pixels must be between 300 and 1800. This field accommodates users who have larger monitors and/or prefer a smaller resolution, such as 1280 x 1024. If a check mark appears in the Full Screen check box, this option is hidden. |
|
|
|
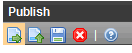
Check this box if you want any button’s caption text to appear in the screen title’s bar whenever a user moves the mouse over the button. Note the word Publish, describing the button, in the illustration below.
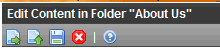
If you do not check this box, the screen’s title remains in the title bar when the user moves the mouse over the button, as illustrated below.
|
|
|
|
If you want one page in your Web site to appear after this user signs in, enter that page’s URL. You might select a page that leads to a group of pages that you maintain. If you don’t know the URL, navigate to the page, go to the browser address bar and select the text following the directory in which Ektron CMS400.NET resides. For example, if the browser address bar says http://www.example.com/customers.aspx?id=945, enter customers.aspx?id=945. |
|
|
|
If you want the Smart Desktop to appear as soon as this user enters the Workarea, click inside this check box. See Also: Personalizing the Smart Desktop If you leave this check box blank, when this user enters the Workarea, he goes to the folder of the content specified at the Landing Page after login field. |
|
|
|
Inherit Task Permissions From User Groups |
This area indicates your task permissions and whether you inherit them from user groups to which you belong. For more information, see Task Permissions. |
|
|
Custom Tab |
||
|
Any custom user properties |
|
|
|
Activities Tab (Tabs only appear when editing) Note: If you disable Notifications, the Activities tab (which lets the user pick Notifications to receive and send) disappears. |
||
|
Colleagues Sub Tab |
Select the notifications you want to receive when a colleague performs an activity, and the agent that transmits the notification. For example, if you want to receive email notifications when a colleague posts a blog message, you would place a check mark in the box for Blog Post in the email column. See Also: Notifications |
|
|
Community Groups Sub Tab |
Select notifications you want to receive when a member of a community group performs an activity relating to the group, the agent that transmits the notification. For example, you want to receive email notifications when a co-member of a community group posts a blog message to group’s blog. To enable this, place a check mark in the box for Group Blog Post in the email column. See Also: Notifications This tab sets preferences for all community groups. [Drive:] \[webroot]\[siteroot]\Workarea\Notifications\Controls |
|
|
My Activities Sub Tab |
Select notifications you want publish when performing various activities on the Web site. For example, if you want to publish notifications when you post a blog message to your blog, place a check mark in the box for Blog Post in the Publish column. See Also: Notifications |
|
| Profile Links Tab - Displays the user's alias if community aliasing is set for users. See Also: Community URL Aliasing | ||

Note: If email notification is turned off in the setup page, you are notified when editing, adding, or viewing a user.
5. Click Save ( ).
).
6. The View Users in Group Everyone screen appears with the new user included in the table.
Note: When you add a new user, he is automatically placed in the Everyone user group. To assign users to other groups, see Assigning Users to User Groups.
7. Continue this process until you add all Web site users, or reach the maximum allowed by your license.
Note: Contact Ektron Sales for pricing of adding more users to your license.
Viewing a User
After adding a user, you can view that information. While viewing a user, you can edit or delete the user.
To view a user, follow these steps.
1. Access the user folder as described in Accessing the User Folder.
2. Click the Username of the user you want to view.
3. The View User Information screen is displayed.
To learn about the fields, see Enter the following information about the user.
From the View User screen, you can edit or delete users. These actions are described in the next sections.
Editing a User
Warning! If you are using Active Directory to edit a user, see Editing User Information in Ektron CMS400.NET.
When editing a user, you can change the username, first name, last name, password, user language, and email address. Also, while editing, you can change three fields that were not available when the user was created.
Account Locked
Work Page Size
Landing Page after login
To edit a user, follow these steps.
1. Access the view user screen of the user you want to edit, as described in Viewing a User.
2. Click the Username of the user you want to edit.
3. The View User Information screen is displayed.
4. Click Edit ( ).
).
5. The Edit User screen is displayed. To learn about most fields, see Enter the following information about the user.
The following fields are only available when editing a user.
|
Field |
Description |
|
Account Locked |
|
|
Content and Forum Editor |
|
|
Forum Signature |
Adds a signature to your posts in the forum. You do not see the signature in the editor. It is added after you click the Post button.
|
|
Work Page Size |
|
6. Make the necessary changes to the user information.
7. Click Update ().
Deleting a User
Warning! If you are using Active Directory to delete a user, see Deleting Users.
When you need to remove a user from the application, you can easily do it from the User’s Folder in the Workarea.
Warning! Once a user is deleted from the database, he is deleted permanently. The process cannot be undone.
To delete a user, follow these steps.
1. Access the view user screen for the user you want to delete, as described in Viewing a User.
2. Click the Username of the user you want to delete.
3. The View User Information screen is displayed.
4. Click Delete ( ).
).
5. A confirmation message is displayed.
6. Click OK.
Removing Users from User Groups
Warning! If you are using Active Directory to remove a user from a group, see Removing Users from a Group.
Note: Removing a user from a user group does not delete the user from Ektron CMS400.NET. Also, you cannot remove users from the Everyone group.
To remove a user from a user group, follow these steps.
1. Access the User Groups folder, as described in Accessing the Users and User Groups Folders.
2. Click the User Group that includes the user you want to remove.
3. Members of the selected group appear.
4. Click the user to remove.
5. The View User Information screen is displayed.
6. Click Delete () to delete the user from the group.
7. A confirmation message is displayed. Click OK.


![]()